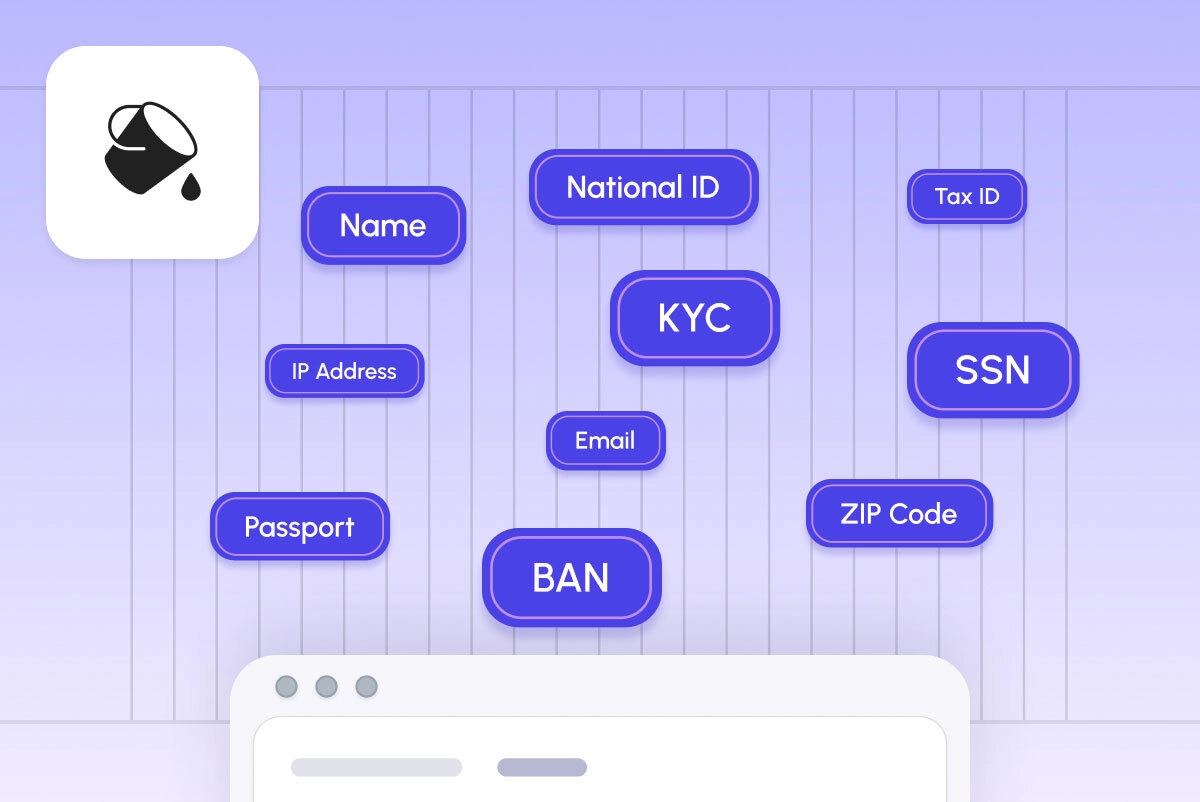
Tokenization is a method of protecting sensitive data by replacing it with a non-sensitive unique identifier: a token. A token only serves as a reference to the original sensitive data but is not derived from it. If an attacker has obtained a token, they can’t simply transform it back to the original sensitive data. To do that, they would also need to obtain permissions to detokenize the token, which they might not have out of the box, thus making the attacker’s life harder, which is the ultimate goal of security.
Tokenization minimizes the exposure of sensitive data to people and the sprawl of sensitive data across applications and their components. It is also a widely used method of implementing pseudonymization, which is an important step in complying with privacy regulations such as GDPR.
Tokens are most useful in a workflow where:
- The original sensitive data is stored centrally in a highly protected data vault.
- Tokens are generated in the data vault and given out to consuming applications without necessarily revealing the original sensitive data. These applications store tokens in their databases.
- Access to the original sensitive data requires a separate set of permissions. A lookup table in the data vault is used to match a token to the corresponding piece of original sensitive data. Retrieving the original sensitive data referenced by a token is called detokenization.
Tokenizing sensitive data brings a number of security benefits. The most important of these benefits is that any data breach that you may experience has way less devastating consequences. Even if a malicious actor breaks into your application’s database, they only get access to tokens that are useless without access to the data vault.
A good example of tokenization usage that saved the day is the 2019 Capital One data breach where tokenized data including social security numbers (SSNs), although exposed, turned out to be useless to attackers as they had no way of mapping them back to real sensitive data.
If you want to dive deeper into tokenization, know more about its benefits and inner workings, as well as to learn how it relates to other data protection techniques like encryption and hashing, see What is Data Tokenization? Everything You Need to Know.
The focus of this article is to explain what types of tokenization exist, outline the use cases that best match each of the tokenization types, and illustrate these use cases with code samples that take advantage of Piiano Vault’s TypeScript SDK.
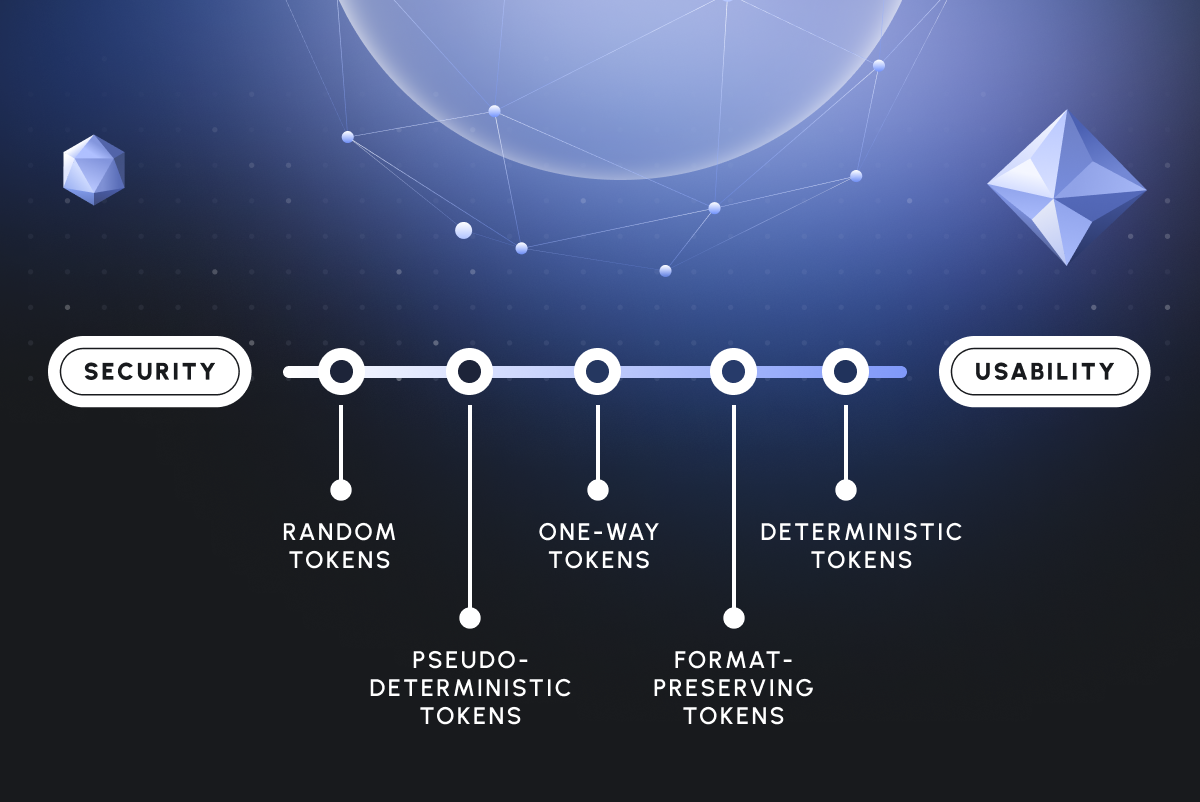
Piiano Vault currently supports 5 types of tokens:
- Deterministic tokens
- Randomized tokens
- Pointer tokens
- PCI tokens
- PCI one-way tokens
Let’s see what’s special about each of these types, as well as when and how to use them.
Deterministic Tokens
Deterministic tokens are generated using a deterministic algorithm: the same input will always produce the same token. Think of it as hashing, except you can always detokenize a deterministic token and access the original data.
These tokens work best with data that serves as a unique identifier of a person, such as email, phone, or SSN.
Deterministic tokens work great when you need to compare the underlying PII for equality. For example, if several applications in your system process an email and one of them needs to check if it’s the same email as that provided by another application, this is made possible by deterministic tokenization because the same value in the same field always outputs the same token. Note that you may need to normalize input (such as converting it to all-lowercase) before tokenizing it if you want equality checks to work.
Deterministic tokens are also useful for data exploration and statistical calculations. They enable you to reliably connect different datasets without fetching the real PII data. For example, if there are two SQL tables that both store SSN tokens, you can join them on these tokens without ever getting access to the original SSNs. This becomes possible because the same original SSN always gets transformed to the same token. Therefore, your systems don’t need to fetch actual SSNs in all scenarios, reducing their potential exposure.
Since deterministic tokens are 100% dependent on the input, they may be susceptible to brute-force and collision attacks. To counter these kinds of attacks, Piiano Vault always uses strong salts when generating deterministic tokens.
Code Sample
If you have a Piiano Vault account, let’s see how you can create a deterministic token using Piiano Vault’s TypeScript SDK.
Before actually creating a token, you need to take a few preparatory steps.
First, install the SDK in your Node.js application:
npm install @piiano/vault-client Now, import the VaultClient class into your JavaScript or TypeScript file:
import {VaultClient} from "@piiano/vault-client";You can now create a new instance of the client and provide it with your Vault URL and API key:
const piianoVaultClient = new VaultClient({
   vaultURL: 'your_vault_url',
   apiKey: ‘your_api_key’,
});
Now, add the following code and run the resulting script to add a new collection of sensitive data to your Piiano Vault account and populate it with sample data:
const collectionName = "token_types_demo";


const collectionExists = async (name) => {
   const collections = await piianoVaultClient.collections.listCollections({format: 'json'});
   return collections.filter(x => x.name === name).length > 0;
}


if (!await collectionExists(collectionName)) {
   await piianoVaultClient.collections.addCollection({
       requestBody: {
           name: collectionName,
           type: "PERSONS",
           properties: [
               {name: "firstName", data_type_name: "NAME"},
               {name: "lastName", data_type_name: "NAME"},
               {name: "email", data_type_name: "EMAIL"},
               {name: "phone", data_type_name: "PHONE_NUMBER"},
               {name: "creditCard", data_type_name: "CC_NUMBER"},
               {name: "cvv", data_type_name: "CC_CVV"},
               {name: "ssn", data_type_name: "SSN"},
           ],
       },
   })


   const data = [
       {
           firstName: "John",
           lastName: "Doe",
           email: "john.doe@example.com",
           phone: "+1-202-555-0143",
           creditCard: "4111111111111111",
           cvv: "123",
           ssn: "123-45-6789"
       },
       {
           firstName: "Jane",
           lastName: "Smith",
           email: "jane.smith@example.com",
           phone: "+44-20-7946-0958",
           creditCard: "5555555555554444",
           cvv: "456",
           ssn: "987-65-4321"
       },
       {
           firstName: "Alice",
           lastName: "Johnson",
           email: "alice.johnson@example.com",
           phone: "+61-2-9374-4000",
           creditCard: "378282246310005",
           cvv: "789",
           ssn: "456-78-9123"
       },
       {
           firstName: "Bob",
           lastName: "Brown",
           email: "bob.brown@example.com",
           phone: "+49-30-3000-4000",
           creditCard: "6011111111111117",
           cvv: "101",
           ssn: "321-54-9876"
       }
   ];


   await piianoVaultClient.objects.addObjects(
       {
           collection: collectionName,
           reason: "AppFunctionality",
           requestBody: data
       }
   )
}
Now that your Piiano Vault contains the sample collection, you can fetch data from it using the client’s objects.listObjects() function:
const emails = await piianoVaultClient.objects
   .listObjects({
       collection: collectionName,
       reason: 'AppFunctionality',
       props: 'email',
   })
Since the props parameter is set to email, the array that Piiano Vault returns will only contain emails from the sample collection’s records:
[
  { email: 'john.doe@example.com' },
  { email: 'jane.smith@example.com' },
  { email: 'alice.johnson@example.com' },
  { email: 'bob.brown@example.com' }
]
Let’s now take the first email record in the collection and create a deterministic token for it:
const firstEmail = emails.results[0];


const tokenDeterministicEmail = await piianoVaultClient.tokens.tokenize({
   collection: collectionName,
   reason: "AppFunctionality",
   requestBody: [
       {
           object: {fields: firstEmail},
           type: "deterministic",
       },
   ],
});


console.log(`Deterministic token for email: ${JSON.stringify(tokenDeterministicEmail)}`);
This tokenize() call, which is a wrapper around the Piiano Vault API’s Tokenize endpoint, returns an array with an object that contains the generated token as the value of the token_id property. If you run your script now, this is what you’ll see:
Deterministic token for email: [{"token_id":"279c641d-912e-eb8f-bceb-12b60b2a7d19"}]Now, if you create another deterministic token using the exact same tokenize() call and save it to a different variable - let’s say, tokenDeterministicEmail2 - the token will be identical to the first one:
// returns "true"
tokenDeterministicEmail.token_id === tokenDeterministicEmail2.token_id
If you want to detokenize the deterministic token, this is how you do it:
const detokenizeTokenDeterministic = await piianoVaultClient.tokens.detokenize({
   collection: collectionName,
   reason: "AppFunctionality",
   tokenIds: tokenDeterministicEmail[0].token_id,
});


console.log(`Deterministic token detokenized: ${JSON.stringify(detokenizeTokenDeterministic, null, 2)}`);
If you run your script now, here’s what you’re going to see in the console:
Deterministic token detokenized: [
  {
    "fields": {
      "email": "john.doe@example.com"
    },
    "token_id": "279c641d-912e-eb8f-bceb-12b60b2a7d19"
  }
]
Randomized Tokens
A randomized token is created using a random number generator and fully ignores the input data. In other words, there’s no correlation between the input and the resulting token in any way.
Randomized tokens are best suited to protect PII that, when taken alone, don’t uniquely identify a person. Use randomized tokens when you want to conceal data but you don’t need to use it to correlate records. A good example is the first name: it’s PII but you’ll hardly use it in your SQL queries as a field to join over.
In a more general sense, it works best with low-cardinality data - that is, data that has a limited set of possible unique values. Boolean data has the lowest cardinality, with true and false being the only two possible values. In practice, if your data has boolean fields representing sensitive information about a person - for example, whether they were convicted or have tested positive for a certain disease - then using random tokenization is ideal as it prevents guessing the original values. Although this requires more storage space for your database table, it makes it way more privacy-friendly.
Use randomized tokens when you only need to tokenize sensitive data for secure storage and then detokenize it at some point in time. If you need to perform operations on your data between tokenization and detokenization, such as verify equality, aggregate or join, don’t use randomized tokens as you’ll get different results every time you tokenize the same input data.
While randomized tokens don’t support any operations other than tokenization and detokenization, the upside is that they’re highly secure because there’s no correlation between the input and the output. Security is also dependent on the quality of the random number generator used: if it’s not good enough, the tokens are going to become predictable.
Code Sample
Continuing to work with the same Piiano Vault collection and client that we used in the code samples for deterministic tokens, let’s now fetch first names from our collection:
const firstNames = await piianoVaultClient.objects
   .listObjects({
       collection: collectionName,
       reason: 'AppFunctionality',
       props: 'firstName',
   })


console.log(firstNames.results);
Running this will output the list of first names to the console:
[
  { firstName: 'John' },
  { firstName: 'Jane' },
  { firstName: 'Alice' },
  { firstName: 'Bob' }
]
Now, let’s take the first returned record and create two randomized tokens from it. Then let’s log the resulting tokens to the console:
const firstFirstName = firstNames.results[0];


const tokenRandomizedFirstname1 = await piianoVaultClient.tokens.tokenize({
   collection: collectionName,
   reason: "AppFunctionality",
   requestBody: [
       {
           object: {fields: firstFirstName},
           type: "randomized",
       },
   ],
});


const tokenRandomizedFirstname2 = await piianoVaultClient.tokens.tokenize({
   collection: collectionName,
   reason: "AppFunctionality",
   requestBody: [
       {
           object: {fields: firstFirstName},
           type: "randomized",
       },
   ],
});


console.log(`Two randomized tokens for the same first name: ${tokenRandomizedFirstname1[0].token_id} and ${tokenRandomizedFirstname2[0].token_id}`);
After running this code, you’ll see in the console output that even though the two randomized tokens were generated based off the same input data, they’re completely different:
Two randomized tokens for the same first name: af0887e4-3f24-464b-a924-7b48f0a0ec2e and 04e61801-d8a2-49c0-a6c8-120f929e864eDetokenizing randomized tokens works the same way as it does with deterministic tokens:
const detokenizeTokenRandomized = await piianoVaultClient.tokens.detokenize({
   collection: collectionName,
   reason: "AppFunctionality",
   tokenIds: tokenRandomizedFirstname1[0].token_id,
});


console.log(`Randomized token detokenized: ${JSON.stringify(detokenizeTokenRandomized, null, 2)}`);
Running your script should result in console output similar to the following:
Randomized token detokenized: [
  {
    "fields": {
      "firstName": "John"
    },
    "token_id": "af0887e4-3f24-464b-a924-7b48f0a0ec2e"
  }
]
Pointer Tokens
Pointer tokens are randomized tokens that represent the current version of an object, as opposed to the version that existed at the time of generating the token.
Use pointer tokens any time you want to hold on to the up-to-date version of the data you’re tokenizing instead of tracking changes in the vault and retokenizing every time a piece of the data is changed.
Note that since pointer tokens are generated randomly, you can’t use them for equality checks, comparison, joining, identity matching, and any other operations that deterministic tokens make possible.
This pointer type is specific to Piiano, and its name comes from a pointer in the C programming language. The pointer token points to an object already stored in the vault, enabling you to see its current version.
Code Sample
To demonstrate how you’d use a pointer token, let’s first fetch emails and IDs of persons in our Piiano Vault collection:
const emailsForPointer = await piianoVaultClient.objects
   .listObjects({
       collection: collectionName,
       reason: 'AppFunctionality',
       props: 'email,id',
   })


console.log(emailsForPointer.results);
If you run this, the console output is going to be as follows:
[
  {
    email: 'john.doe@example.com',
    id: '404b0204-1924-4628-a3e5-c22dbe156cd7'
  },
  {
    email: 'jane.smith@example.com',
    id: '84e14c97-74cd-4765-a39a-6b07040edf49'
  },
  {
    email: 'alice.johnson@example.com',
    id: 'c84e6234-07f9-494f-bdcb-7abf3313eeba'
  },
  {
    email: 'bob.brown@example.com',
    id: '1b5f9419-9194-43da-b37e-bb4bd58fcd2f'
  }
]
We’re fetching IDs along with emails because in order to create a pointer token, you’re required to supply the ID of the record you’re about to tokenize. You can tokenize the entire record if you want to, but for this sample, let’s just tokenize the email in the first record, which is currently set to john.doe@example.com:
const firstEmail = emailsForPointer.results[0];


const tokenPointerEmail = await piianoVaultClient.tokens.tokenize({
   collection: collectionName,
   reason: "AppFunctionality",
   requestBody: [
       {
           object: {id: firstEmail.id},
           type: "pointer",
           props: ["email"]
       },
   ],
});
Now, let’s update this first record to change the email to john.does.new.email@example.com. Then, we’ll list all emails again to make sure that the email in the collection has been updated. We’ll log the pointer token to the console, and then we’ll detokenize it and see which email it maps to:
await piianoVaultClient.objects.updateObjectById({
   collection: collectionName,
   id: firstEmail.id,
   reason: "AppFunctionality",
   requestBody: {
       email: 'john.does.new.email@example.com'
   },
});


const afterUpdate = await piianoVaultClient.objects
   .listObjects({
       collection: collectionName,
       reason: 'AppFunctionality',
       props: 'email,id',
   })


console.log(afterUpdate.results);


console.log(`Pointer token for email: ${JSON.stringify(tokenPointerEmail)}`);


const detokenizeTokenPointer = await piianoVaultClient.tokens.detokenize({
   collection: collectionName,
   reason: "AppFunctionality",
   tokenIds: tokenPointerEmail[0].token_id,
});


console.log(`Pointer token detokenized: ${JSON.stringify(detokenizeTokenPointer, null, 2)}`);
Here’s the console output that you’re expected to see after running this piece of code:
[
  {
    email: 'john.does.new.email@example.com',
    id: '404b0204-1924-4628-a3e5-c22dbe156cd7'
  },
  {
    email: 'jane.smith@example.com',
    id: '84e14c97-74cd-4765-a39a-6b07040edf49'
  },
  {
    email: 'alice.johnson@example.com',
    id: 'c84e6234-07f9-494f-bdcb-7abf3313eeba'
  },
  {
    email: 'bob.brown@example.com',
    id: '1b5f9419-9194-43da-b37e-bb4bd58fcd2f'
  }
]
Pointer token for email: [{"token_id":"a036c3e0-54cf-4647-afbf-6ac85ca3a7b2"}]
Pointer token detokenized: [
  {
    "fields": {
      "email": "john.does.new.email@example.com"
    },
    "token_id": "a036c3e0-54cf-4647-afbf-6ac85ca3a7b2"
  }
]
As you can see, even though we have tokenized the email back when it was set to john.doe@example.com, detokenizing the pointer token returns the newer email. That’s the whole point of the pointer token (pun intended).
Technically, you can think of a pointer token as a way of generating a new persistent ID for any object or group of properties in an object inside Piiano Vault.
PCI and One-Way PCI Tokens
PCI tokens are used in accordance with PCI DSS (Payment Card Industry Data Security Standard), which protects sensitive cardholder data, such as payment card numbers. When you ask your customers to enter their payment card information into an iframe that captures the input and sends it directly to a secure PCI-compliant storage such as Piiano Vault, you only receive a token. The real data never touches your servers, they stay out of the PCI scope, and your company doesn’t need to be PCI compliant.
There are two subtypes of these tokens: regular PCI tokens and one-way PCI tokens. The difference between them is that the latter can’t be detokenized. One-way PCI tokens are used for analytical purposes, such as when your data analysis team wants to count the total number of payment cards or the total number of transactions made using a specific payment card, all without being able to detokenize card data.
Under the hood, PCI tokens are implemented as pseudo-deterministic tokens. This means that the first tokenization is performed using the randomized tokenization algorithm, but the resulting randomized token is reused going forward.
The purpose of PCI tokens is to pass the actual payment card data to an external provider and only store a token in your systems. To see how this workflow can be implemented using the Piiano Vault TypeScript SDK and the JavaScript forms library included with the SDK, see How to collect payment details online.
Who can access tokenized cards then? PCI tokens are used to keep credit card numbers secure while still being able to charge from the cards. The secure design of PCI tokens states that you can never detokenize them yourself. A vault will never give you access to credit card numbers directly. Instead, you can use a PCI Proxy component to forward the real numbers to a payment provider that is eligible to use the numbers.
Format Preserving Tokens
Format preserving tokens are not a distinct type of token but rather an option that you can use with any type of tokens described above.
By default, tokens are generated as 128-bit UUIDs (GUIDs). Although this maximizes their uniqueness, the downside is that the resulting token may not conform to the data type used in your database or pass whatever validation that your existing systems put it through.
When you use tokenization to scramble production data before moving it to a pre-production environment and the tokenized data needs to fit into the same database schema as that used in production, the UUID format may just not work or break functionality.
When you work with legacy systems that you’re unable to update the source code for, and you know that these systems store data insecurely, you’d be better off using tokens in a specific format instead of real data.
In these cases, format preservation comes in handy, letting you store and validate tokens that adhere to the format of the original data but bear no exploitable value.
Code Sample
We’ll demonstrate format preservation on a deterministic token, but you can use it with any of the other token types described above.
First, let’s fetch credit card numbers from our Piiano Vault collection:
const creditCards = await piianoVaultClient.objects
   .listObjects({
       collection: collectionName,
       reason: 'AppFunctionality',
       props: 'creditCard',
   })


console.log(creditCards.results);
After running this code, you should see the following output:
[
  { creditCard: '4111111111111111' },
  { creditCard: '5555555555554444' },
  { creditCard: '378282246310005' },
  { creditCard: '6011111111111117' }
]
Now, let’s take the first credit card record and tokenize it using the deterministic method and two additional request body properties: fptemplate to specify which predefined format template to use and fpprops to specify fields to apply it to:
const firstRecord = creditCards.results[0];


const tokenFpCreditCard = await piianoVaultClient.tokens.tokenize({
   collection: collectionName,
   reason: "AppFunctionality",
   requestBody: [
       {
           object: {fields: firstRecord},
           type: "deterministic",
           fptemplate: "primary_account_number",
           fpprops: ["creditCard"]
       },
   ],
});


console.log(`Format-preserving deterministic token for a credit card number: ${JSON.stringify(tokenFpCreditCard)}`);
When you run this code, you’ll see the following output:
Format-preserving deterministic token for a credit card number: [{"token_id":"4111111413901111"}]As you can see, instead of a UUID, Piiano Vault has generated a token that follows the credit card format. The first six and the last four digits are preserved while all the other digits are randomized.
Summary
You have learned the different types of tokens that can be generated with Piiano Vault, how they differ, what use cases they serve, and what kinds of sensitive data each of them is the best fit for.
The most secure type of token is PCI, because it simply can’t be detokenized as is, no matter what permissions you have over the vault. It also represents a great design pattern for securely storing other data types in certain scenarios, such as OAuth tokens.
You have also seen specific code samples that use Piiano Vault’s TypeScript SDK to create and populate Vault collections, as well as list, update, tokenize and detokenize collection objects.
You can use the SDK to connect to Piiano Vault from your JavaScript and TypeScript code. If you need to do it in more languages, take a look at other SDKs that Piiano provides, including those for Java and .NET applications.
Ariel, despite holding a PhD in Computer Science, doesn't strictly conform to the traditional academic archetype. His heart lies in the realm of hacking, a passion he has nurtured since his early years. As a proficient problem solver, Ariel brings unmatched practicality and resourcefulness to every mission he undertakes.


It all begins with the cloud, where applications are accessible to everyone. Therefore, a user or an attacker makes no difference per se. Technically, encrypting all data at rest and in transit might seem like a comprehensive approach, but these methods are not enough anymore. For cloud hosted applications, data-at-rest encryption does not provide the coverage one might expect.
Senior Product Owner
.jpg)